Orders are processed within 1–3 business days (Monday–Friday, excluding holidays). Standard Shipping takes an estimated 5–8 business days and Expedited Shipping takes an estimated 3–5 business days. We ship within the United States only. You will receive a tracking number by email after shipment. See our Shipping Policy for details.
1
/
of
6
Cleverwiz
Bentousa Decorative Hard Boiled Egg Yolk Mold 4 Shapes
Bentousa Decorative Hard Boiled Egg Yolk Mold 4 Shapes
Regular price
$37.99 USD
Regular price
$37.99 USD
Sale price
Unit price
/
per
Shipping calculated at checkout.
Couldn't load pickup availability
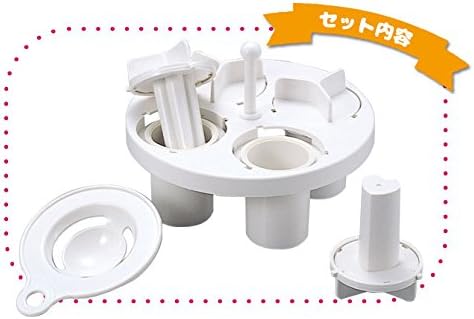
- Hard Boiled Yolk Egg Mold 4 Shapes
- Create flower, heart, star and diamond patterns eggs
- Complete Egg Decorative Kit
- Simple to uses
Create sliced hard boiled eggs with four different designs of yolk that will amaze your friends. This unique egg mold / mould will make flower, heart, star and diamond patterns within the egg core. Simply remove the cooked egg, slice and decorate your salads or use as a snack treat. Here’s Step by Step INSTRUCTIONS for our easy to use cooking yolk egg mold. - Step 1 Brush cooking oil on the mold. (a little amount) - Step 2 Use the separator provided to separate yolk and white of raw eggs. Retain both in 2 different small bowls. - Step 3 Remove the plastic design core from each of the cups. Add to each cup approx. 1.35 oz. of egg white (or about 1 egg for each cup). Re-insert the design core to each cup. Notice the lock and click feature that secures them when cooking. Be sure you have clicked cap to the right after inserting to mold. Tip - Do not add the egg white to the top, leave some space, as the egg may be a little expanded when hard boiled. - Step 4 Submerge the entire egg mold into a pot of boiling water taking care that the water level comes to top edge of the mold. Let the egg white cook in the water for 10 – 12 minutes and remove from heat. Tip - do not boil with too high temperature, as when boiling too hard, the water may get into the uncooked egg. TIP - Egg white should be allowed to cool in the mold for a few minutes before you pull out the design core. You now have your shape in the center of each egg white to add raw yolk. - Step 5 Pour the raw yolk, approx. 1 ounce per each cup (see proprotion of the white egg). - Step 6 Remove just the design core, leaving only the locking cap piece. - Step 7 Secure the top with the locking cap, again clicking in place by turning to the right. Submerge the mold again for another 8 minutes to cook the yolk. Allow to cool. - Step 8 Remove the locking cap and then push from bottom the entire cooked egg out of the mold cup.
Share